

HotEnds, liquifiers, toolheads, extruders, shooty-squirty-plastic guns - just what are these and why are they so important to the 3D printers? What makes a good HotEnd, what makes a bad HotEnd, and what makes an excellent HotEnd? We at E3D have been making them since 2012, and we’ve learnt a thing or two.
Just what is a HotEnd anyway?
A HotEnd is a component integral to the build of 3D printers; unlike many of other components, the HotEnd cannot be 3D printed and is thus known as a ‘Vitamin’ , (other vitamin parts include belts. Motors, pulleys, motherboards, etc).
But how does it work?
In a nutshell, HotEnds act as a ‘glorified glue gun’ which is fed spaghetti-shaped plastic by a filament drive, or as they’re more colloquially known, an extruder. Sometimes these two components are one and the same, sometimes they’re fixed together, and sometimes they’re a distance away and are connected by a tube of PTFE.
Either way, the filament is driven by the extruder into the top orifice of what’s known as the HotEnd’s ‘cold side’, through the HotEnd, and into the ‘hot side’, here the plastic becomes gooey, and then viscous, before eventually extruding through the nozzle at the bottom of the HotEnd’.
Once extruded, filament is laid down into a path; this path will eventually form one layer (or one slice) of the print.
Simple right? Not necessarily. HotEnds have seen continual development for the 30 or so years since their inception and are in fact quite complex components.
Although making a HotEnd of your own might sound easy - engineering a HotEnd capable of operating without leaks, clogs, heatcreep or other disruptions for 10,000s hours of continuous use is a totally different story. It even took us a number of goes to get it right, hence why our HotEnd is the V6.
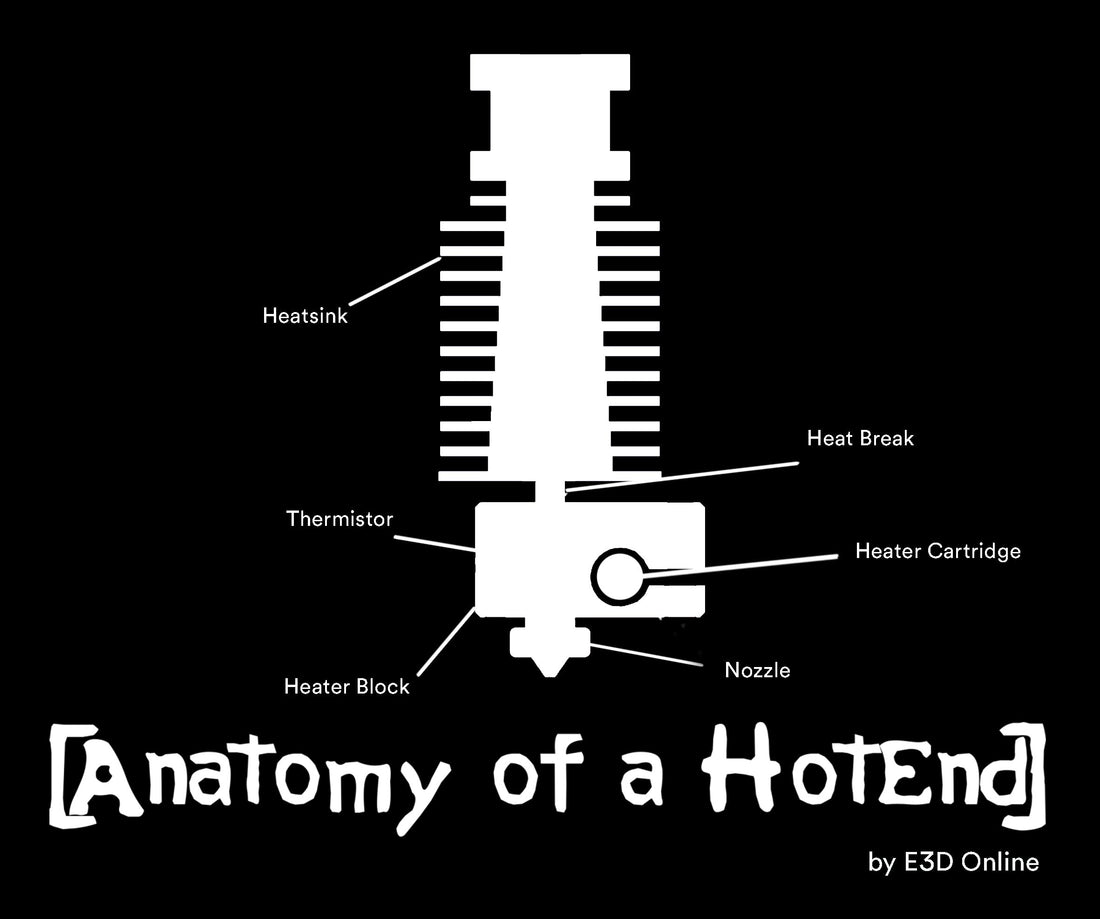
What parts make up a hotend:
The HeatSink

The HeatSink makes up the majority of what is known as the ‘coldside’ or cooling system for the hotend. It operates as a heat exchanger redirecting heat away from the filament path. This is achieved by maximising surface area exposed through the use of precisely machined fins; keeping the coldside cool, in what we call active cooling.
The active cooling’s effect is exemplified through the use of a mounted DC fan (using a duct) that blows air into the HeatSink’s fins - this ensures continuous circulation of the surrounding air and steers cool air in and around the fins.
In some more advanced cooling systems other techniques are used, such as passive cooling, pumped air cooling and even liquid cooling.
Liquid cooling is typically reserved for advanced extrusion systems and is more efficient than fan cooling. A continuous stream of cool water is pulled from a reservoir and through the HeatSink, continuously collecting heat transmitted as it travels through the HeatSink. This heated water is then delivered back into the fan-cooled reservoir and recycled.
Liquid cooling is the go-to cooling method when printing in heated enclosures (where fan cooling alone is less effective) or when working with high temperature polymers such as PEEK.
The HeatBreak

The HeatBreak is a threaded metal tube which both mechanically secures, and thermally separates the coldside of the HotEnd from the hotside. The HeatBreak is typically made of stainless steel, or in some cases titanium due to its lower thermal conductivity.
The HeatBreak is made up of 2 sides: one which threads into the HeatSink and stays cold; and the other which threads into the HeaterBlock and stays hot. It is within the HeatBreak that the filament’s property changes into one of a more viscous material in a process not too dissimilar to melting.

Hot side versus cold side
As the material travels through the HeatSink, it is both cold and solid and easily slides down the bore of the HotEnd. The material then enters the HeatBreak and as it travels down further, the temperature of the surrounding HeatBreak begins to increase - both heating and softening the polymer. This softening transition happens in the most constricted point in the middle of the HeatBreak; a section we’ve (very creatively) named:
![]()
The property change experienced by polymers is unique. Unlike how an ice cube melts, the polymer doesn’t transition immediately into a liquid. Instead, the polymer enters a soft rubbery state, gradually becoming more and more putty-like. Eventually it becomes a viscous fluid of molten polymer at the hot side of the HeatBreak.
As the material softens, it resists downward travel by deforming and adhering to the walls of the HeatBreak; this tendency is actually often the cause of many clogs in poorly designed and manufactured HotEnds.
Whereas in an E3D V6, we carefully manage the transition zone by keeping it very short (2mm) and manufacturing the HeatBreak with an internal gloss-like surface finish, preventing the softened material from adhering to the walls of the HeatBreak.

As it so happens, the adherence of the filament is utilised by the HotEnd as a means of coaxing the molten polymer into the hotside and out the nozzle.
You see, as the filament enters the transition zone and softens, it also expands. This forms a soft rubbery plug between the gooey fluid on the hotside, and the solid brittle filament. This expanded plug creates a pressure seal which allows the solid filament to act like a piston and push the molten plastic out the nozzle, where this rubbery plug is the seal of the pistoné.
As it so happens, many users do not realise that this is a completely normal part of how a HotEnd functions, and upon removing filament from their HotEnd they are concerned to see the expanded tip on the end; they may fear the worst - when in reality everything is fine.
The HeaterBlock

Serving a contrasting duty to the HeatBreak, the HeaterBlock is often made out of aluminium or copper - these being materials with high thermal conductivity. The HeaterBlock is responsible for mechanically and thermally coupling the heater, the sensor and the nozzle into a single collaborative system.
Perhaps more importantly, the HeaterBlock acts as a reservoir of heat for the nozzle to top up with, keeping its temperature stable and reducing thermal fluctuations.
The Heater Cartridge

The heater cartridge is an electrically-powered, tube-shaped device, embedded with a heating coil. Electricity cycles current through thin wires in the head of the heater cartridge. The tightness of the wire causes many collisions between the electrons and atoms within the wire which in turn generates heat. These wires are coiled into closely knit rings allowing heat between the individual coils to be shared and thus maximised.
Standard E3D heater cartridges have a power output of 30 watts which is tuned to allow the hotend to print at 300°C. We have intentionally chosen this wattage to maximise material potential of the HotEnd. Although printing above 300°C is possible with our standard heater cartridge, heating the aluminium block higher than 300°C causes it to soften and lose integrity; similarly the thermistor will also fail.
Printing more advanced polymers (which require temperatures above 300°C) is easiest with the use of high temperature heater cartridges (65W). Printing at these heights requires the use of specialized plated copper HeaterBlocks to prevent the block softening. Our high temperature range allows users to print upwards of 500°C; which is more than enough for any polymer ever conceived.
The Temperature Sensor

The thermistor is a specific type of sensor responsible for detecting the temperature of the HeaterBlock. Based on the detected heat, the sensor sends a signal to the heater cartridge switching it on or off. This in turn cajoles the hotside into retaining an idealised temperature - in a process more commonly known as a control loop.
- If the block is below the desired temperature the signal switches on the heater cartridge
- If the block is above the desired temperature the heat sensor switches the heater cartridge off.
Some temperature sensors do their job better than standard thermistors. Those who want sharper results and faster reactions can upgrade to PT100s or even thermocouples - these use alternative methods at sensing temperatures which are more complicated yet more reliable than standard thermistors.
The Bowden Tube

Bowden tubing is a more atypical part of the HotEnd as it is only required for certain HotEnds. Typically made from slippery materials like PTFE, bowden tubing serves the purpose of cleanly delivering filament into the top of the HeatSink. With this role in mind, bowden tubing is much more vital in printers utilising bowden setups, than those using direct drive.
- In a direct drive setup the extruder is mounted to the top of the HotEnd, feeding directly into the HeatSink.
- In bowden setups, the extruder is mounted elsewhere on the printer and feeds filament into bowden tubing. The other end of the tubing is inserted into the top of the printer’s HeatSink and is held in place with a collet clip.
The most effective bowden tubing has a well constrained, slippery filament path to prevent friction and backlash within the tube as represented on the below diagram.

Standard PTFE tubing vs. Capricorn PTFE tubing with it’s more constrained filament path.
The Nozzle

The nozzle is the final piece which completes our HotEnd puzzle, and perhaps the most important.
The internal geometries of a nozzle are precisely angled to allow optimal flow from its orifice and prevent clogs; its external geometries are also important. A well designed nozzle will have a flat tip surrounding its extrusion point which effectively ‘trowels down’ the layers of filament ejected from it. This flattening of layers is vital to ensure they bond to each other and the bed during the printing process.
As it turns out there is also an optimal ratio between the diameters of the hole and the flat tip, this ratio is something we employ in the production of every single nozzle we offer at E3D.
Nozzles are interchangeable and fit the user’s purpose. If the user wishes to print as rapidly as possible, they should opt for a nozzle with a large orifice diameter. Alternatively, if a user wishes to have a highly detailed print, they should use a nozzle with a tiny orifice diameter; the baseline size for most nozzles is a 0.4mm diameter.
In a similar vein, nozzle materials are also switched out to take advantage of the strengths each material possesses.
For instance, hardened steel nozzles excel when faced with abrasive filaments such as carbon fibre, which would otherwise tear up a brass nozzle’s internal geometries.
Whereas, plated copper nozzles stay robust when heated to high temperatures, which nozzles made of other materials would soften at; making them ideal for printing polymers with substantial glass transitions.
What HotEnds Print
Nowadays, a well-constructed, all-metal HotEnd can print essentially every polymer out there; so a better question might be - what is a polymer?
Plastic is a type of polymer, but not every polymer is a plastic. Thermoplastic is a specific type of plastic possessing a malleable and stringy nature when heated. Thermosetting plastics do not possess this nature, and instead blacken under heat. Some thermoplastics are also ‘resins’, meaning that they also contain any number of additives, colours or fillers which change their overall consistency and take them out of that stringy malleable nature essential for FDM 3D printing.
The first thermoplastics utilised by the industry were ABS and PLA, with PLA still being a fan favourite today due to how easy it is to print with. However, over the years HotEnds have grown to cope with a multitude of unique polymers such as PETG, Nylon, PVA and even PEEK.
“PLA is one of the hardest materials to thermodynamically manage...”
It may surprise you to know, but despite its popularity, PLA is one of the hardest polymers to thermodynamically manage. Makers enjoy PLA’s low printing temperature and its extremely sticky nature (with dreamlike interlayer adhesion) but this stickiness is ironically a common cause of HotEnds clogging. It was through iterative procedure that we eventually landed on the internal HotEnd geometries we have today, optimising flow rates and minimizing clogs from not only PLA, but other tenacious polymers.
What happens to a polymer when heated
Interestingly, a polymer tends to retain its cool and stiff, glass like state throughout the majority of a heating process. It is only when the polymer reaches a certain temperature (usually somewhere around 200°C), when the polymer suddenly becomes viscous and rubbery - this point is known as the polymer’s ‘glass transition’. Here the polymer may take on a whole host of other property changes that vary wildly dependent on which polymer you’re working with.
Feeling the Pressure?
Polymers undergoing the ‘glass transition’ exhibit an interesting habit - they expand and build pressure. This pressure forces the nozzle to extrude filament, which in turn undergoes a phenomenon known as ‘die swell’. Die swell refers to how built up pressure in the polymer springs back to its original size when released. Die swell predominantly occurs as the polymer is ejected from the nozzle.

It is for this reason that nozzle size doesn’t quite parallel with extrusion width; tracks laid down by the HotEnd are often wider than the nozzle’s orifice size. Die swell leads to confusion in individuals who measure the width of the track with calipers.
HotEnds rely on the same pressure which causes die swell in order to function. Filament feeding into the HotEnd must stay back-pressured to keep the HeatBreak plugged and the viscous polymer beneath it flowing.
As a result of this, HotEnds experience something called ‘pressure delay’ - the appearance of less filament coming out the HotEnd than being fed into it.
Extrusion Temperatures
Another common oversight made by makers is that they assume that when filament is extruded from the HotEnd, it is the same temperature as the nozzle. As previously detailed, the filament doesn’t spend enough time within the hotside to match its temperature. So naturally, the hotside is heated to an increased temperature to ensure the filament reaches a viscous state.
Ergo, although PLA ‘prints’ at 200°C, it really leaves the nozzle is around 150-160°C.
A Perfectly Balanced HotEnd Prevails Against Heatcreep
A large majority of clogs in poorly made HotEnds are caused by 'heatcreep'. Heatcreep is a plague on the function of HotEnds: heat will attempt to clamber its way up your HotEnd and cause the filament to liquify early, expanding above the designated transition zone of the HeatBreak. Heatcreep is a tenacious beast that will clog your HotEnd if you let it.

Thankfully, heatcreep can be tamed and prevented; all it takes it a precisely machined, temperature-balanced HotEnd. Care should be taken to ensure the cold side of the HotEnd dissipates enough heat to cope with the temperature of the hotside; but not too much cooling to prevent the hotside reaching its desired temperatures.

So in short, HotEnds are complicated - more complicated than they’re given credit for; and they’re difficult to manufacture well. At E3D we’ve spent been designing HotEnds since 2012 and have done all the worrying for you, ensuring ideal functionality with every piece. Keeping you printing and not have you worrying about: what on earth ‘glass transition’ is; whether or not your temperature is properly balanced or if you'll wake up to a failed print and a clogged nozzle the next morning.
Check out our range of HotEnds.
1 comment
Excelent Bro, your information its really great